A series of Ubiquiti routers can act as a VPN server, which are also known as UniFi Gateway. UniFi Gateway supports Layer 2 Tunneling Protocol (L2TP) Virtual Private Network (VPN) connectivity, allowing users to remotely access an internal network via establishing a VPN connection. The ability to establish a secure VPN tunnel through L2TP over IPsec is typically built into a modern operating system such as Windows, macOS, iOS and Android. Therefore, there is no need to install additional software for connection. However, there are some procedures involved with the setup of an L2TP VPN connection on both the client and the VPN server, which in this case is a UniFi Gateway. This article demonstrates the steps to configure a Ubiquiti Dream Machine router for accepting L2TP VPN connections, as well as the procedure to initiate a secure VPN connection from the client device to the VPN gateway. A section about enabling VPN connection alerts is also included.
- Table of Contents
- Good things to know: Teleport VPN
- Part 1: Configure Ubiquiti Dream Machine as a VPN Server
- Part 2: Configure Alerts on VPN Connections
- Part 3: Configure L2TP over IPsec VPN Connection on a Client Device
- Part 4: Establish a VPN Connection between the VPN server and the Client
- Part 5: Add a route to Enable Split Tunneling
- Part 6: Remotely Access Applications Hosted in an Internal Network
Good things to know: Teleport VPN
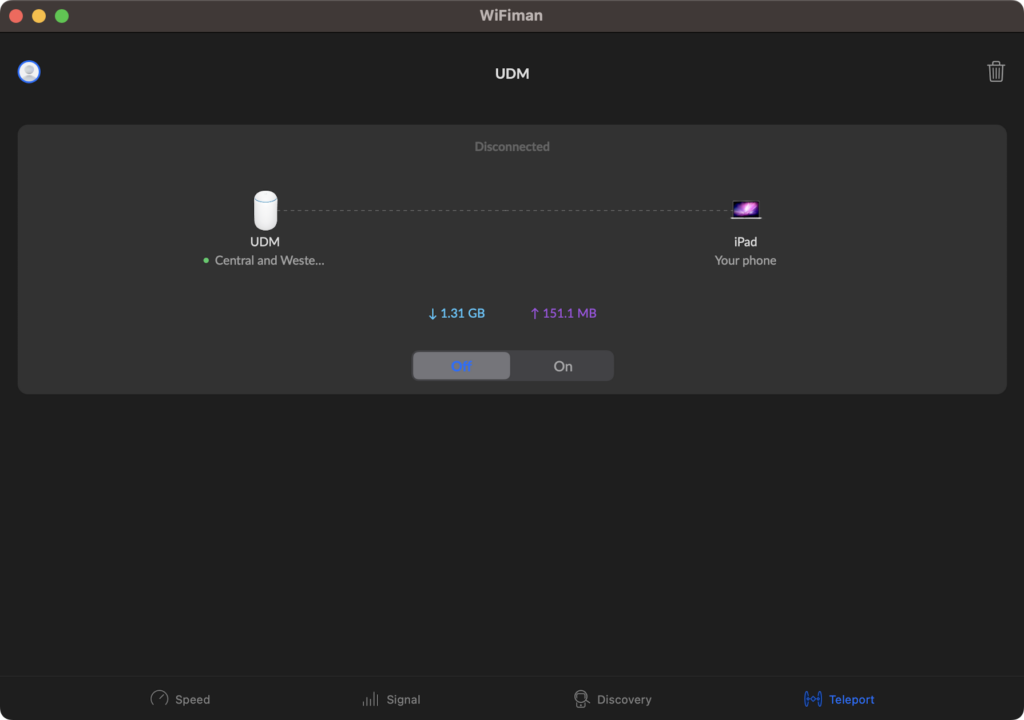
Ubiquiti offers a feature called Teleport VPN for zero-configuration VPN access. It can be accessed through an application called WiFiman . It is available on iOS and macOS (essentially an iOS app running on a Mac). However, it does not support split tunneling as of early 2023. Also, an application must be installed on a client OS to initiate a VPN connection to the router. Depending on the use cases, Teleport VPN can be a good choice if #1) simplicity is desired, #2) an application can be installed on your operating system, and #3) there is no need to use split tunneling.
Part 1: Configure Ubiquiti Dream Machine as a VPN Server
To begin with, navigate to your Ubiquiti Unifi Console admin page.
On the Teleport & VPN page, Enable VPN Server. Confirm that the VPN Protocol is listed as L2TP.
Enter a pre-shared key (PSK). The pre-shared key will need to be provided on a client device later as well. Note that the pre-shared key is used for IPsec encryption. L2TP itself is a VPN protocol which does not include any encryption. Therefore, it is required to add the pre-shared key to authenticate both the client OS and the VPN server and establish an encrypted connection.
The UniFi Gateway IP is automatically displayed on the GUI. Be aware that the IP address is the same public IP assigned (WAN IP) assigned by your ISP. Therefore, the address may be changed periodically unless a static IP address service is in-place. If the ISP-assigned public IP is changed, you must use the new IP address to connect to your environment.
On the User Authentication area, create a new user. Specify an account name and password. Again, the username and password must be provided on the client device.
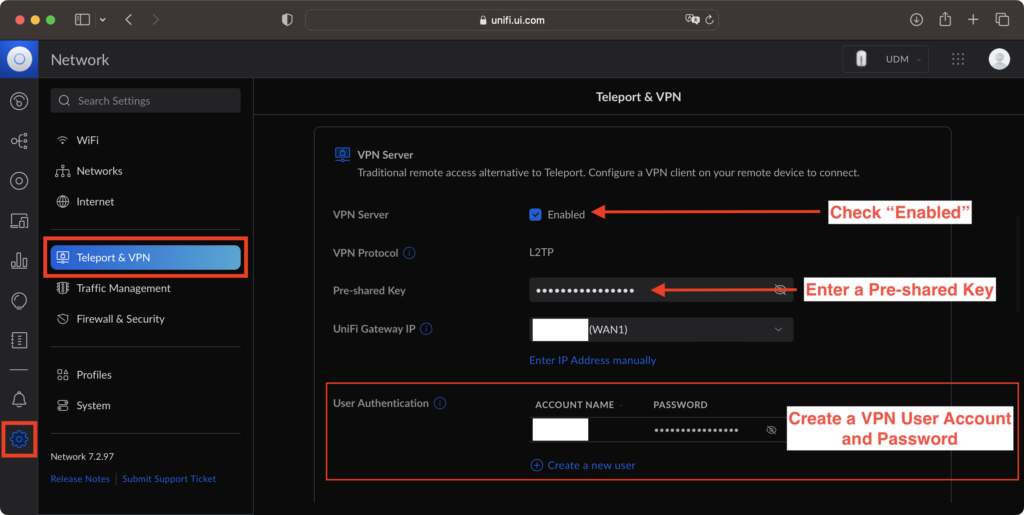
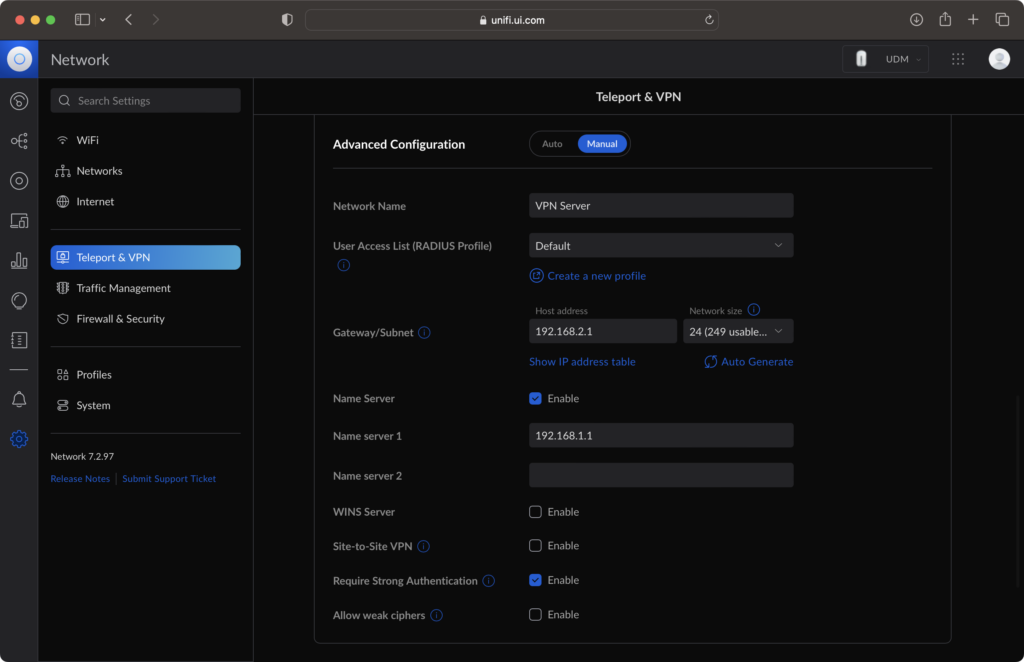
By default, Ubiquiti VPN server will create a separate subnet (192.168.2.0/24) for assigning an IP address to your remotely connected device. Ensure that the name server is configured as the same address as your gateway, which is often the Ubiquiti router itself (by default: 192.168.1.1). It allows remote devices connected to the VPN to use Dream Machine as the DNS server for DNS query. Ensure that “Require Strong Authentication” is checked.
Part 2: Configure Alerts on VPN Connections
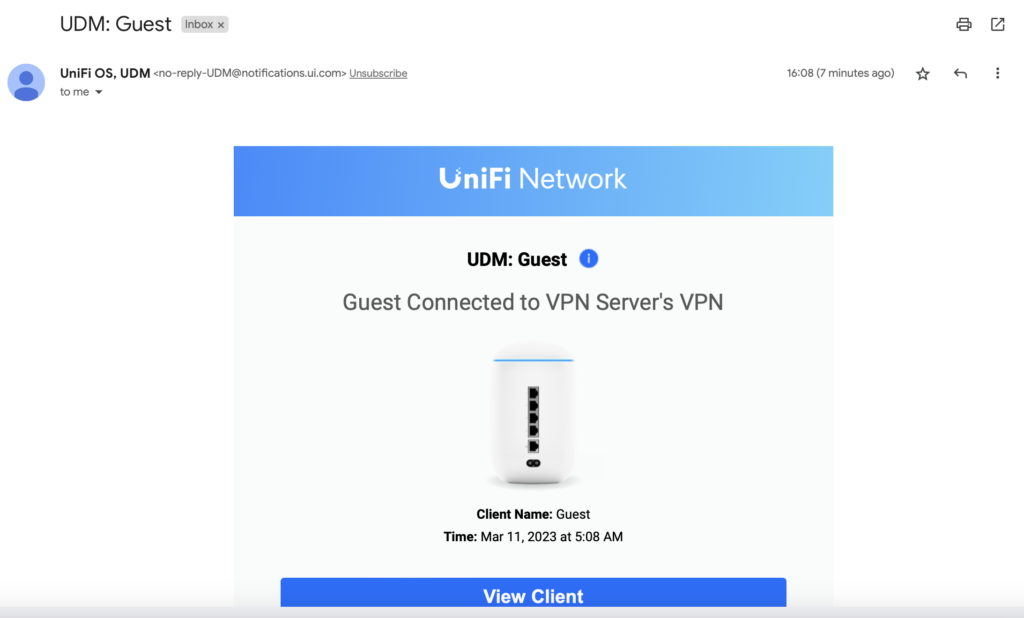
On Ubiquiti UniFi console, enable “VPN Client Connection Change” alert definition on “System” > “Advanced Notifications”.
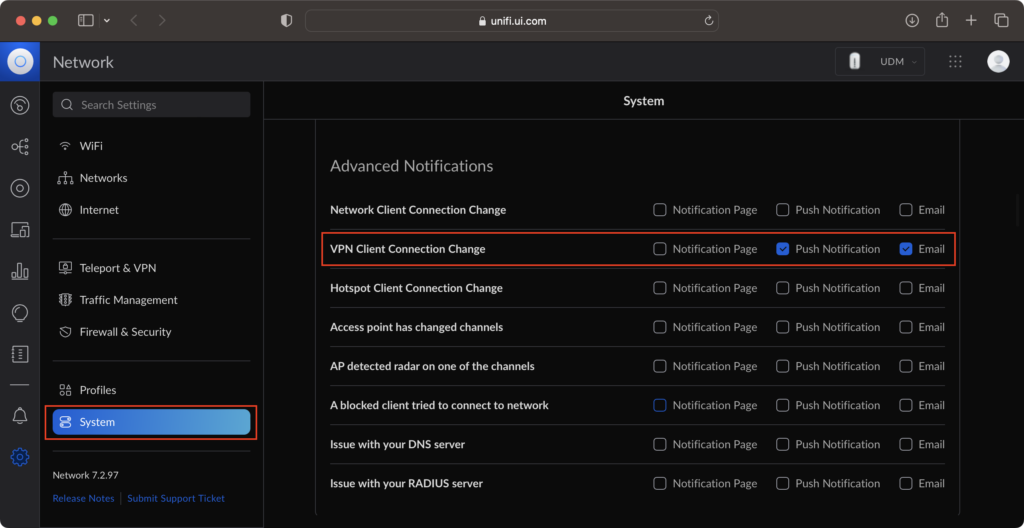
Alerts will be sent to your email address shall there be a new VPN connection / disconnection.
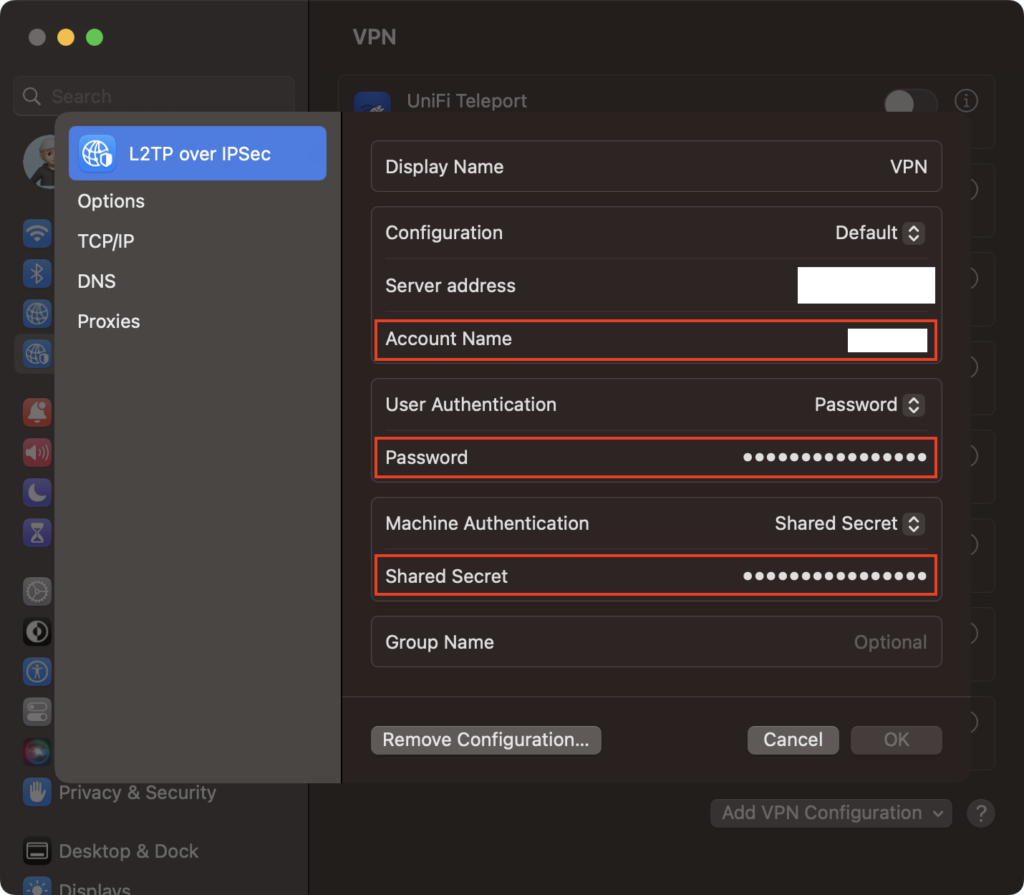
Part 3: Configure L2TP over IPsec VPN Connection on a Client Device
On the client device, navigate to the VPN setting page. Enter the same settings as per the configuration on Ubiquiti UniFi Console, including:
#1) Server Address (WAN Address of your Ubiquiti router)
#2) Account Name
#3) Password
#4) Shared Secret (which is the pre-shared key configured on the UniFi gateway earlier)
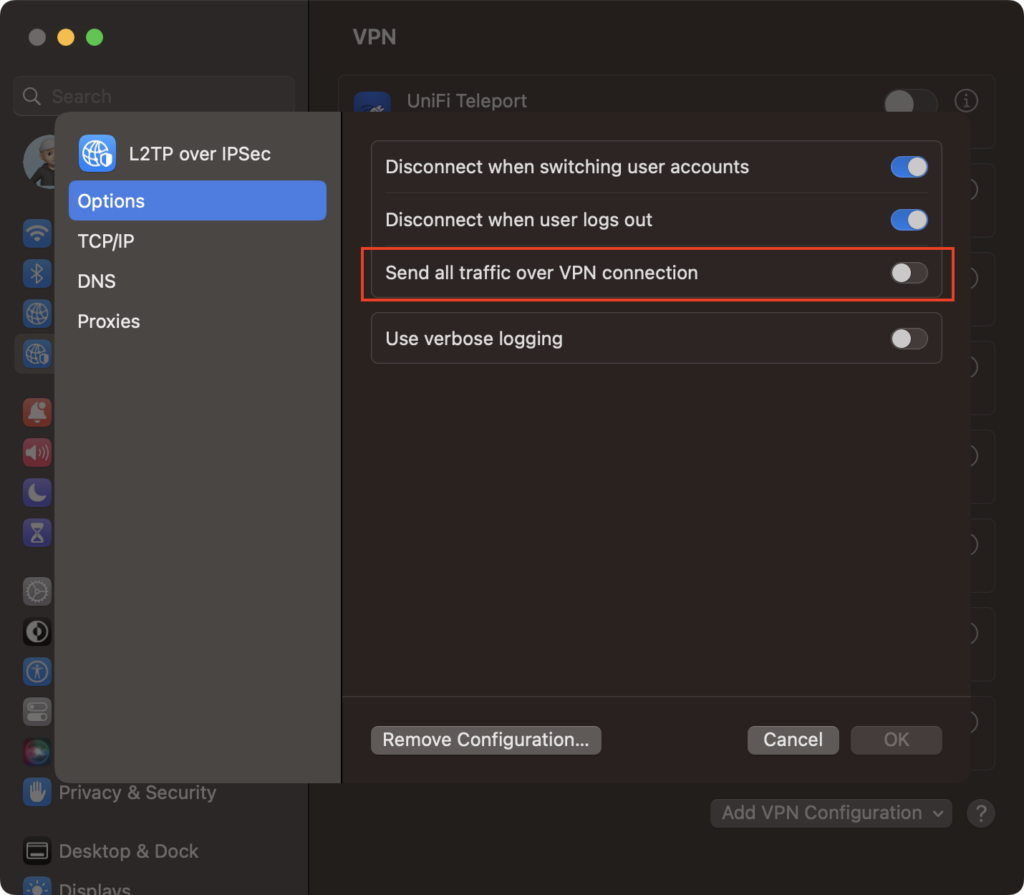
For split tunneling, disable the option: “Send all traffic and save the configuration.”
Part 4: Establish a VPN Connection between the VPN server and the Client
To establish the VPN connection, simply enable the VPN profile created in the above step.

If successful, the L2TP tunnel will be established.

The IP address assigned by the router can be checked after the connection.
% ifconfig | grep 192 -C 1

ppp0: flags=8051<UP,POINTOPOINT,RUNNING,MULTICAST> mtu 1280

inet 192.168.2.6 --> 10.255.255.0 netmask 0xffffff00
From the ifconfig output above, we can see that network interface: ppp0 is used for connecting to the remote network, which is assigned with the IP address 192.168.2.6/24 through DHCP.
Part 5: Add a route to Enable Split Tunneling
After the VPN connection is established, we can go to the 192.168.2.0/24 network. However, by default, there is no route going to the 192.168.1.0/24 network. As the primary network, including the router, is on the 192.168.1.0/24 network, we need to add a route on the client OS to access network resources on the 192.168.1.0/24 network via split tunneling.
% netstat -rn | grep ppp0

default            link#25            UCSIg            ppp0
10.255.255.0       192.168.2.6        UH               ppp0
192.168.2          ppp0               USc              ppp0
224.0.0/4          link#25            UmCSI            ppp0
255.255.255.255/32 link#25            UCSI             ppp0
We can do that by executing “route add” command:
% route add 192.168.1.0/24 -interface ppp0After adding the route, we can verify that with netstat and ping.
% netstat -rn | grep ppp0

default            link#25            UCSIg            ppp0
10.255.255.0       192.168.2.6        UH               ppp0
192.168.1          ppp0               USc              ppp0
192.168.2          ppp0               USc              ppp0
224.0.0/4          link#25            UmCSI            ppp0
255.255.255.255/32 link#25            UCSI             ppp0
Pinging the gateway on 192.168.1.0/24 network.
% ping 192.168.1.1
PING 192.168.1.1 (192.168.1.1): 56 data bytes
64 bytes from 192.168.1.1: icmp_seq=0 ttl=64 time=235.863 ms
64 bytes from 192.168.1.1: icmp_seq=1 ttl=64 time=237.454 ms
64 bytes from 192.168.1.1: icmp_seq=2 ttl=64 time=234.011 ms
Part 6: Remotely Access Applications Hosted in an Internal Network
After the VPN connection has been established and a route is added to the client OS, we can access remote resources. As demonstrated in the above section, all remote resources within 192.168.1.0/24 network are now reachable – just like in a LAN connection.
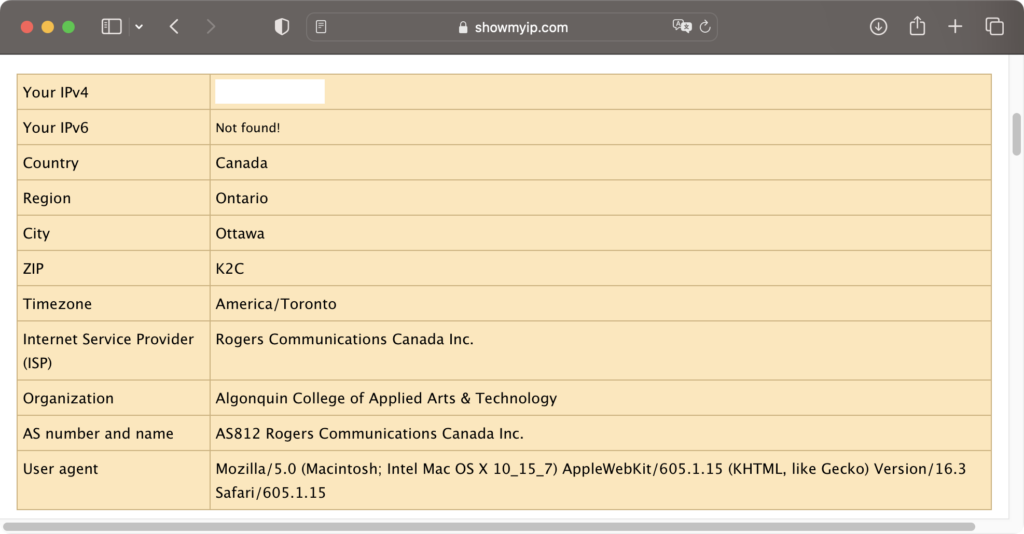
The advantage of split tunneling is that there is no need to send all traffic to the VPN connection. If the VPN server (i.e., the Ubiquiti gateway device) is physically far away from the user location, the speed of browsing regular website content will be slower. Through split tunneling, for example, we can browse website content using a high-speed, low-latency local network (without going through the VPN connection) and connect to a remote server using RDP protocol through the VPN connection.
As shown on below web page, the ISP information is still the same provider in a campus Wi-Fi network rather than another ISP in a remote location.