If you are familiar with the concept of Virtual Machine (VM), you should know that an EC2 instance is basically a VM running on Amazon Web Services (AWS).
What makes running an EC2 instance special, however, is its convenience. Creating a VM from an ISO is nothing new. But how can you segregate your network? How to assign a static public IPs to your VMs? How to manage your resources remotely? Cloud Computing Services like (AWS, GCP, Azure) simplifies these tasks by providing you with a single-pane-of-glass solution – also known as Infrastructure as a Service (IaaS) and Platform as a Service (PaaS).
Launching an EC2 instance is easy, but there are few things you may wish to know before using your promotional credit or spending money on AWS resources.
The Basics
EC2 Instance Types:
An EC2 instance can be a #1) Dedicated #2) Reserved, #3) On-demand and #4) Spot request.
Dedicated host: Basically a host reserved for you. Most suitable for a lift-and-shift migration whereas it is easier to comply with software license agreements.
Reserved instance: You are certain that your instances will keep running so you purchase a reserved instance plan just like signing a mobile phone contract (eg. 12/36 months term). It provides you with a discount compared with on-demand requests.
On-demand request: Pay as you go. You pay for the consumed resources in a per hour/second basis.
Spot request: Pay as you go – similar to on-demand requests but cheaper – you set a price ceiling and your spot instances may be terminated if AWS do not have enough computing capacity or its spot request price exceeds the ceiling you set. This is useful for UAT and non-critical workload.
A Spot Request can allow “up to a 90% discount compared to On-Demand prices”.
https://aws.amazon.com/ec2/spot/pricing/
EC2 Storage:
There are three terms you must know regarding EC2 storage: #1) Elastic Block Storage (EBS) volume, #2) EBS Snapshot and #3) Amazon Machine Images (AMI).
Elastic Block Storage (EBS): You must attach an EBS volume to launch an EC2 instance. If you stop an EC2 instance, EBS will keep on running. However, terminating an EC2 instance may delete the associated EBS volume if the ‘delete on termination’ option is enabled – all data in your instance will be lost! You should make a snapshot / AMI before deleting an EBS.
EBS Snapshot: You can create a snapshot from your instance to backup your EBS volume. You cannot launch an instance from an EBS snapshot alone because it does not contain the metadata required to boot an OS – you need an AMI to do so. You can create an AMI from an EBS snapshot or create the AMI from your EC2 instance in the first place.
Amazon Machine Images (AMI): During creation, you can choose whether reboot is permitted. Rebooting helps ensure the integrity of the file system so it is highly recommended to enable the reboot option. An AMI is created based on a snapshot, which means an AMI is always associated with a snapshot and you cannot delete a snapshot if the associated AMI is not deregistered. When you create an AMI from an EC2 instance, a snapshot will be created first and an AMI will be generated afterwards.
Networking:
Put everything aside, you must know the concept of #1) Security Groups and #2) Elastic IPs.
Security Groups: They are like the firewall of your EC2 instances. By default, all outgoing traffic from your instance is allowed but a SSH inbound rule with the source of 0.0.0.0/0 is set should you choose to create a new security group. You should change the SSH inbound rule to your own IP address because you don’t want people from all over the world to try connecting your instance via SSH. If you want to run a web server, you may need to allow HTTP(80)/HTTPS(443) inbound traffic to your instance with the source of 0.0.0.0/0 or your own IP address if it is for testing.
Elastic IPs: Every time the Public IP assigned to your instance will be different should you not associate an Elastic IP to it. If you want your instance to have the same Public IP address, you should allocate an Elastic IP and associate it with your instance – you can associate after launching the instance. Again, this is critical if you want to run a server as you do not want your Public IP to be changing all the time.
Create an EC2 instance
On the EC2 dashboard, select “Launch Instance”.
Step 1: Select an AMI of your choice.
Step 2: Choose an instance type. You should refer to AWS for on-demand instance pricing.
https://aws.amazon.com/ec2/pricing/
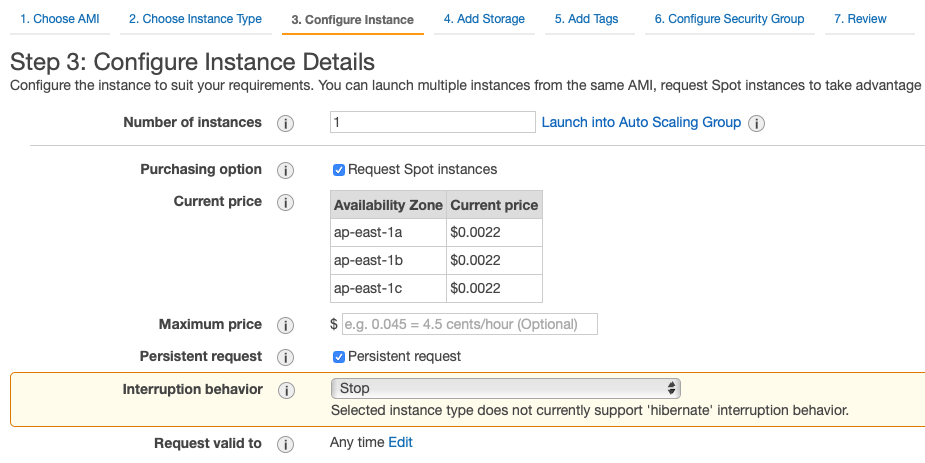
Step 3: Configure your instance:
Read more about AWS announcement of EC2 Persistent Spot Instance Lifecycle
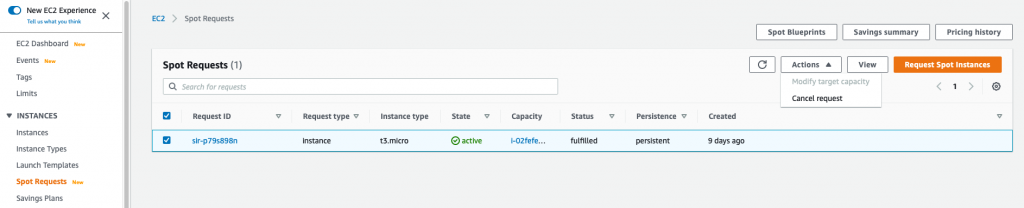
P.S. Just remember that if you want to terminate your persistent Spot Instances for good, you should do so in the Spot Request dashboard. Otherwise, your persistent Spot Instances may keep ‘respawning’ after termination.
There are other instance configurations not covered here such as network settings. For an initial hands-on, you can leave those settings as default. AWS by default will assign a Public IP to your instance. If you find no public IP has been assigned, you need to request a new instance with the option “Auto-assign Public IP” enabled or associate an Elastic IP to your instance.
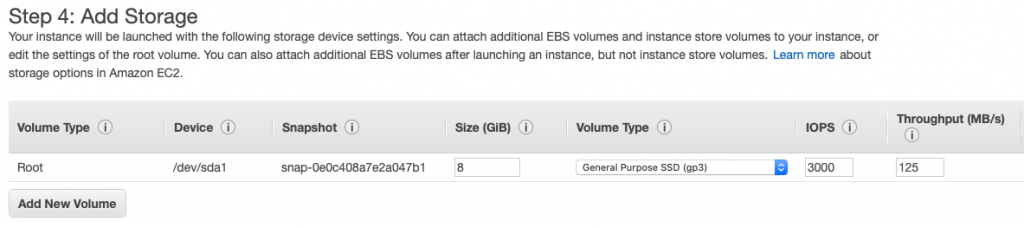
Step 4: Create or add an EBS volume to your instance. Here we choose to use the new gp3 EBS volume, which provides cost savings over gp2 volume. You can also specify the IOPS but keep in mind that additional charges may apply. Again, check the pricing on AWS official website before proceed.
https://aws.amazon.com/ebs/pricing/
Step 5: Add a name tag to help identify your instance. Without a name tag, you have to rely on instance IDs to identify your resources. You can choose to apply the name tag to an EC2 instance / EBS volume, or both.

Step 6: Apply a Security Group – from here you can either select pre-defined security groups or create new ones. For configuring new security groups, it allows you to specify the inbound rules, you can select the “Type” (e.g. SSH) and enter the “Source” (e.g. you IP address). It is crucial to configure security groups because they determine who can connect to your instance, as well as the applications you want to run as they may require specific inbound ports to be opened.

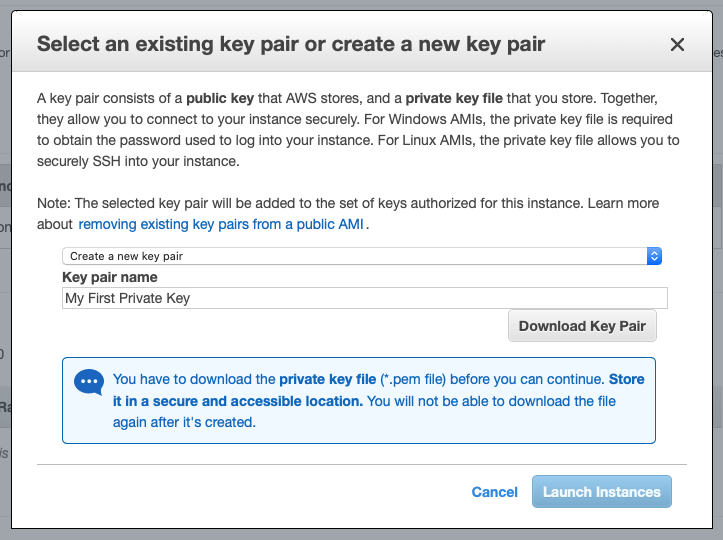
Step 7: Review the details and launch. After clicking launch, a prompt will ask to you select a key pair. If you have not created one before, you need to create a new one with a key pair name of your choice. You must download the private key file in order to proceed because it is the only way for you to connect to your instance. Remember to save the private key in a secure location – you cannot download the private key again later on. You can reuse the private key when you create new instances and choose the same key pair.
Connect to your instance
Connecting to your instance is simple.
Step 1: Locate the private key you downloaded when you create the instance. For macOS and Linux, set the permissions for it to be only readable only by you. (e.g. chmod 400 key.pem)
Step 2: Specify the private key you want to use for connecting to your instance. (eg. PuTTY, SSH in macOS terminal).
https://docs.aws.amazon.com/AWSEC2/latest/UserGuide/putty.html
Step 3: Connect via the public IP address / DNS of your instance, and that’s it!